Windows 11 KB5035853 update failed to install (Solved)
Experiencing issues with Windows 11 KB5035853 update installation? Explore expert solutions to troubleshoot and resolve update failures, ensuring your system stays up-to-date and secure.

Keeping your Windows 11 operating system up-to-date is crucial for security, performance, and access to the latest features. One of the recent updates, KB5035853 Cumulative Update, brings various bug fixes and performance enhancements. However, at times you may encounter issues, Windows 11 update failed to install or is stuck download hours. Several users report the Windows 11 KB5035853 update stuck download Windows 11 KB5035853 update fails to install with different errors. It could be slow internet, security software, or a corrupted update database that causes this issue. whatever the reason, this article explores few effective troubleshooting steps to fix the Windows 11 update failed to install or is stuck downloading hours issue.
Windows 11 update failed to install
Windows 11 update failures can occur due to a variety of reasons. Often, a sluggish or unstable internet connection can impede the seamless download and installation of updates. Conflicts with third-party antivirus and security software can also hinder the update process. Additionally, insufficient disk space on the device may prevent the successful installation of update files.
Check Internet connection
Before moving forward, check and make sure you have a stable Internet connection to download Windows 11 KB5035853 update files from the Microsoft server. Again disconnect VPN if configured on your device and uninstall any third-party antivirus software.
A simple restart of your computer can help clear temporary glitches that may be hindering the update process. After the restart, check for updates again.
Check your device has enough free disk space to download and install or apply the updates. Or move some files to an external device and run the disk cleanup tool.
Run Update Troubleshooter
The built-in Windows update troubleshooter is designed to identify and fix problems that may be preventing updates from installing correctly. It scans for issues related to Windows Update and its associated services, and if any problems are detected, it attempts to resolve them automatically.
- Click on the Start menu and select Settings.
- Choose System from the left pane, then click on Troubleshooter on the right-side menu.
- Click on other troubleshooters, This will display all available troubleshooters list, select Windows update then click on run.
The troubleshooter will then begin scanning for any issues. If it finds and fixes any problems, it may resolve the update installation failure. After running the troubleshooter, it’s a good idea to restart your PC and check for updates again.
Run system file checker utility
When system files become corrupted or go missing, it can disrupt the update process, leading to failures or errors during installation. Running tools like the System File Checker (SFC) and the Deployment Imaging Service and Management Tool (DISM) detect and repair these corrupt or missing system files.
- Press the Windows key + S, type cmd in your search box, and open the Command Prompt as Administrator.
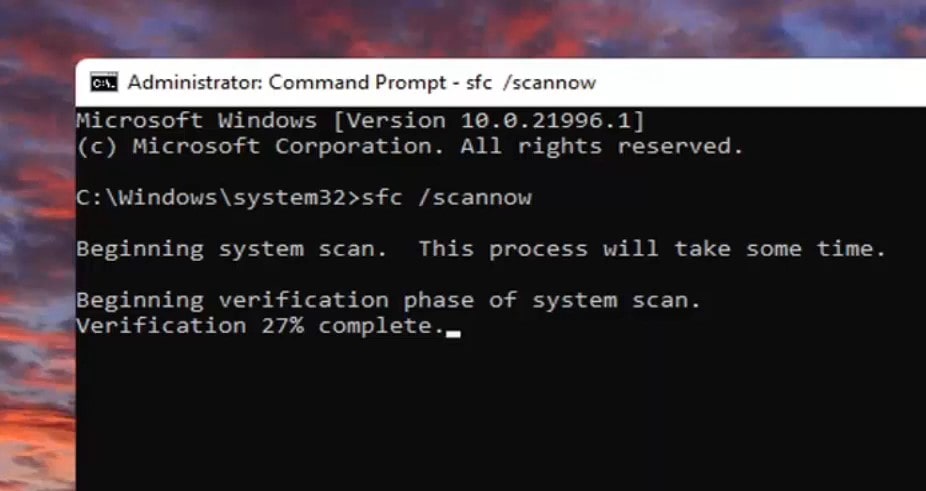
- Type sfc /scannow and press Enter. Allow the scan to complete.
The SFC tool scans and checks for integrity violations within system files. If it detects any corrupted or missing files, it attempts to repair them automatically.

Let the scanning process complete 100%, Once you executed the command, type the following command and press Enter to restore damaged files,
- DISM /Online /Cleanup-Image /CheckHealth
- DISM /Online /Cleanup-Image /ScanHealth
- DISM /Online /Cleanup-Image /RestoreHealth
Finally, restart the system and try to install the pending update.
Reset Windows Update components
Issues with Windows update agent-related services or the update cache can cause Windows update install problems. In such situations reset Windows update components and clear the update cache to help fix Windows 11 update problems.
- Open Command Prompt as Administrator (press Windows key + S, type cmd, right-click and select Run as Administrator).
- Now type the following commands to stop Windows update and its related services Background Intelligent Transfer Service (BITS) and Cryptographic service
net stop bits
net stop wuauserv
net stop appidsvc
net stop cryptsvc
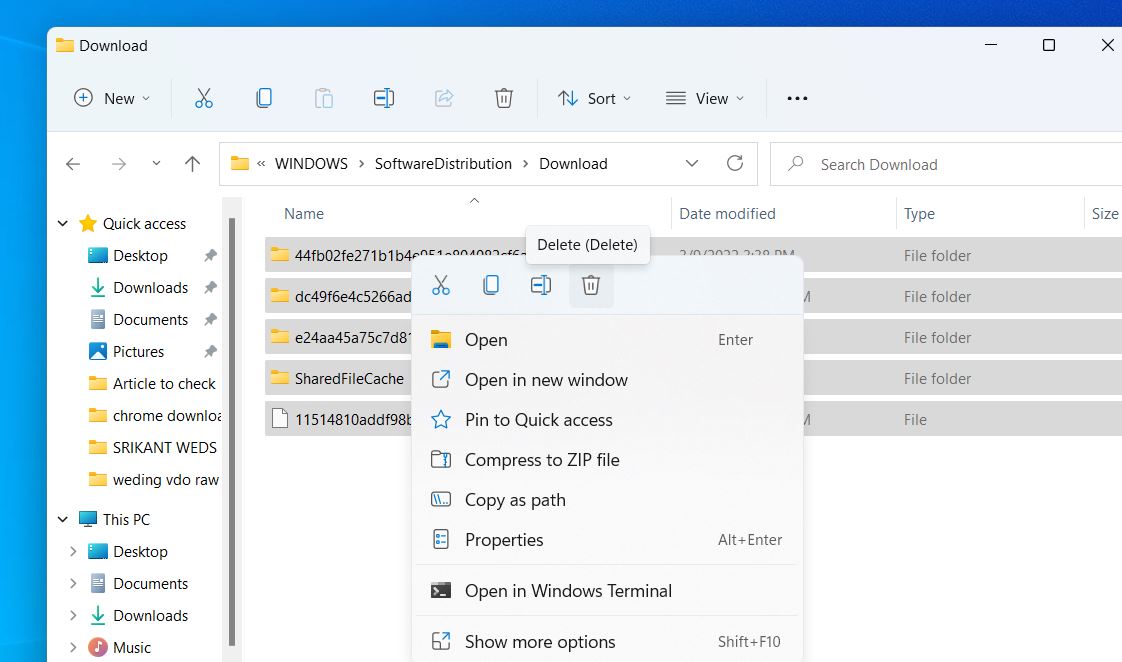
- Navigate to C:\WINDOWS\SoftwareDistribution\Download and delete all files and folders inside the download folder.

- Now again open the command prompt and restart Windows Update and its related services using the following commands
net start bits
net start wuauserv
net start appidsvc
net start cryptsvc
Finally, close the command prompt and restart your computer and check for updates again.
Download and install the latest update manually
If all else fails, manually downloading and installing the update can be a reliable solution:To do so,
- Navigate to the Microsoft Update Catalog, and search for the KB number of the security update that’s failing to install.
- For example KB5035853 (Till today this is the latest update for Windows 11)
- Save the update file to your computer, and run it after it finishes downloading.
- Finally, restart your computer to apply the update now run winver command. And check the build number should be Windows 11 version 22H2 build 22631.3296.
Switch Google DNS
In addition, a few users report changing the DNS address or switching to Google DNS to help them fix Windows 11 updates not downloading or failing to install issues. To do so,
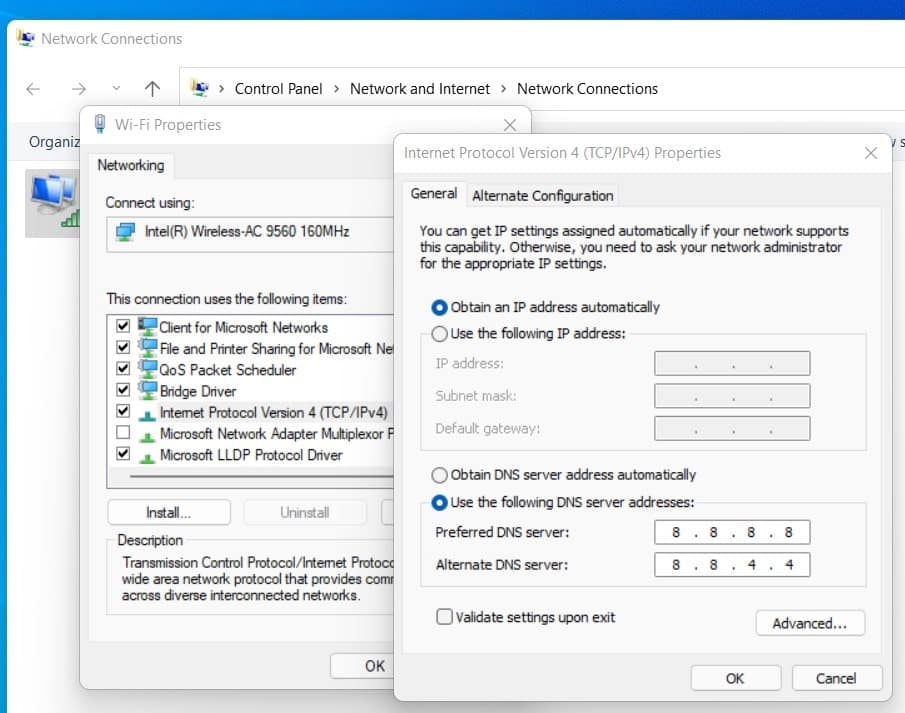
- Press Windows key + R, type ncpa.cpl and click ok, to open the network connection window,
- Locate and right-click on your active network adapter, select properties,
- Select Internet Protocol version 4 (TCP/IPv4) then click on properties,
- Select the radio button Use the following DNS server addresses and set preferred DNS server 8.8.8.8, Alternate DNS server 8.8.4.4
- Finally, click ok then apply to save the changes and restart your PC.
- Now check for updates again.

By following these steps, you can ensure your operating system is up-to-date, secure, and performing optimally. If you encounter any further issues, don’t hesitate to seek further assistance.
Remember to save your work and restart your system after applying any changes. If you have any additional questions or concerns, feel free to leave a comment below.
