Solved: Windows 10 Laptop slow shutdown and restart problem
If you notice Windows 10 shutdown time is longer than before or Windows 10 Takes Forever to Shutdown after update apply this tips to speedup windows shutdown.

Microsoft Windows 10 is the fastest OS ever, takes no more than a few seconds to start or shut down. But sometimes after clicking on the shutdown button, you might notice Windows 10 Takes Forever to Shutdown or Windows 10 shutdown time is longer than before. A few numbers of users report, windows 10 slow shut down after the 2022 Update, And the time to shut down increased from about 10 seconds to around 90 seconds. If you also notice your computer has Windows 10 slow shutdown issue don’t worry here we have simple solutions to apply.
Windows 10 slow shutdown
Well, the prime reason for this problem is likely to be corrupted Drivers or Windows system Files which won’t let Windows shut down quickly. Again incorrect power configuration, Windows update bug, or virus malware running on the back end prevent windows from shutdown quickly. whatever the reason here quick tips to speed up Windows 10 shutdown and start.
Disconnect all external devices (printer, scanner, external HDD, etc) and try shutdown windows, check if this time windows start or shut down quickly.
Run third-party system optimizers like CCleaner or malware bytes to optimize system performance and fight against virus or malware infection. That helps speed up Windows 10 performance and makes your computer start and shut down faster.
Update Windows
Microsoft regularly releases security updates with various bug fixes and installing the latest Windows update fixes the previous problems as well. Let’s first install windows updates (if pending there are any).
To check and install the latest windows updates
- Open the Settings app, to do so press the windows key + I
- Click Update & security than windows update,
- Now hit the check for updates button to allow the download and install the latest updates from the Microsoft server
- Once done restart your PC to apply them
Run Power-Troubleshooter
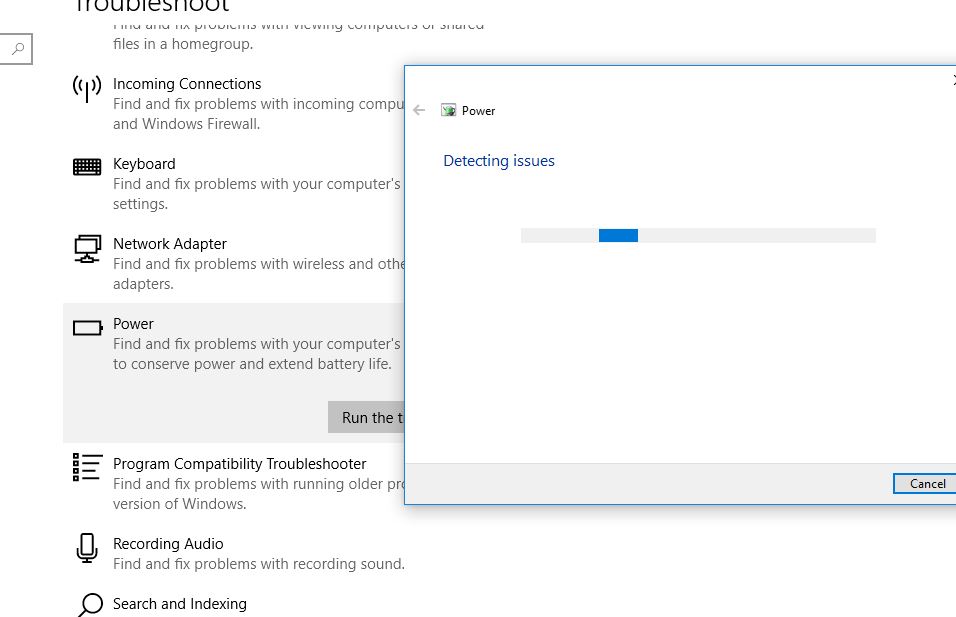
Windows 10 has its own set of solutions to its problem. Let’s run the built-in windows power troubleshooter and allow windows to resolve power issues such as the “Windows shutting down very slowly” issue itself.
- Search for troubleshooter settings and select the first result,
- Scroll down to find the Power option in Find and Fix other Problems section.
- Tap on it and click on Run the troubleshooter.
- This will automatically detect the problems especially relevant to your power management and assign on-screen tasks to troubleshoot the issue.
- Therefore, this approach will resolve the Slow speed shutdown of Windows 10.
- Once the diagnosis process completes restart your PC and check the startup and shutdown time is quicker than before.
Turn off Fast Startup
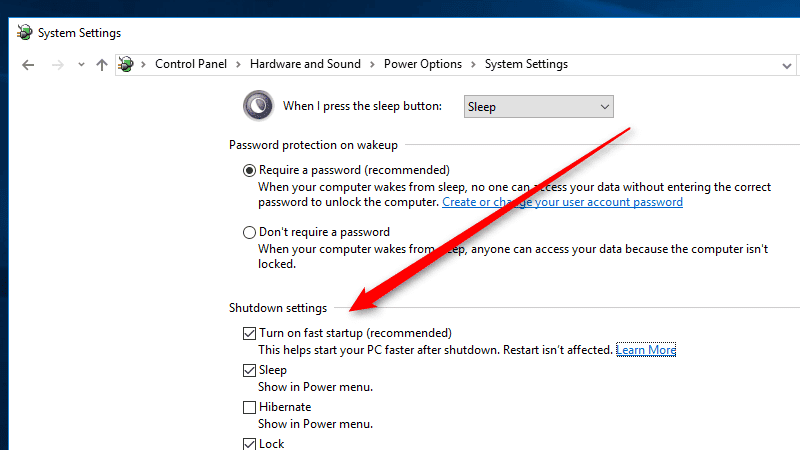
This method seems irrelevant because it is all about Startup and not Shutting down, But being a power setting, many users benefitted from this method when performed.
- First Open the control panel, Here search for and select power options,
- Or you can press the Windows key + R, type powercfg.cpl and click ok to open the same power options window,
- Navigate to the left pane to tap on “Choose what the power buttons do “.
- Consequently, Click “Change settings that are currently unavailable“.
- This will let you Check the Shutdown settings checkboxes.
- Uncheck the “turn on fast startup” option.
- Click on “Save changes”.
This little change in the Power setting might speed up the shutdown process and fetch you out of the Windows 10 Slow Shutdown issue.
Reset the Power Plan default
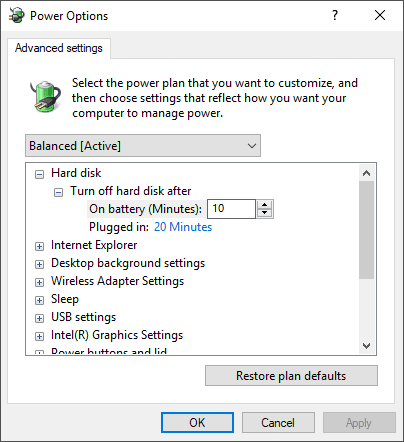
Reset the power plan to its default settings to resolve the problem, If the incorrect power plan configuration prevents windows 10 start and shutdown quickly. Again If you have been using a customized power plan then try resetting it once
- Again open the control panel then power options,
- Select the power plan according to your requirement and click on ‘Change plan settings.
- Click on ‘Change advanced power settings.
- In the power options windows, click on the button ‘Restore plan defaults.
- Click on ‘Apply’ and then the ‘OK button.
Perform System File Checker
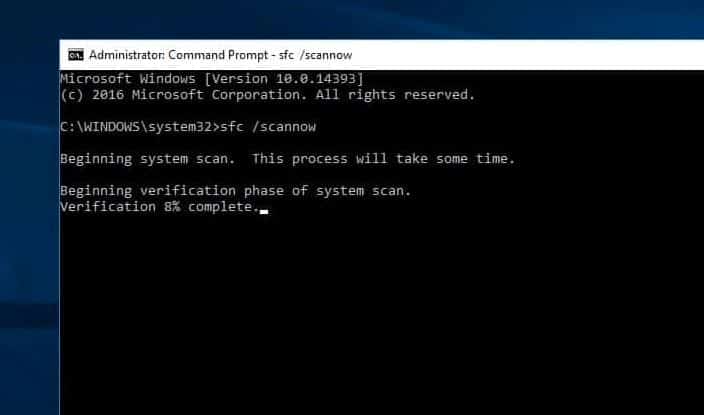
As discussed before corrupted and missing system files mostly prevent windows function normally. Run the System File Checker (SFC) utility following the steps below that repair system files by replacing corrupted sys files with a cached copy
- Press Windows key + S and type cmd, Right click on the command prompt select run as administrator,
- Type the command sfc /scannow and hit the enter key,
- This will start scanning the system for corrupted missing files if found any the SFC utility automatically restores them from the compressed cache folder.
- Wait until the verification is 100% complete, once done restart your PC.
Run DISM command
Still facing the Windows 10 Slow Shutdown problem you should go for repairing the DISM (Deployment Image Servicing and Management).
- Again open the command prompt as administrator,
- type command Dism /Online /Cleanup-Image /RestoreHealth and hit the enter key,
- Wait for the DISM to repair successfully.
- Once done again run the sfc /scannow command
- And restart your PC after complete 100% of the scanning process.
Check disk drive errors
Again if the disk drive has bad sectors you might experience high disk usage, windows 10 slow performance, or take time to start or shut down. Run the build-in check disk utility that detects and tries to fix disk drive errors themselves.
- Open the command prompt as administrator,
- Type the command chkdsk /f /r c: and press enter key.
- Here C is the drive letter where the windows were installed.
- Press Y to schedule run check disk utility to run on the next start,
- close everything, and restart your PC to start the repair process.
Tweak windows registry
And finally tweak the windows registry editor, which probably helps improve windows 10 shutdown and start time.
- Search for regedit and select the first result to open the windows registry editor,
- Backup registry database then navigate the following key,
- Computer\HKEY_LOCAL_MACHINE\SYSTEM\CurrentControlSet\Control
- Ensure you have a selection box over Control in the left pane then seek for WaitToKillServiceTimeout in the right pane of the registry editor window.
Pro tip: If you are unable to find the value then right-click in an empty area (on the right pane of the Registry Editor Window) and Choose New > String Value. Name this String as WaitToKillServiceTimeout and then Open it.
- Set its value between 1000 to 20000 which indicates a range of 1 to 20 seconds respectively.
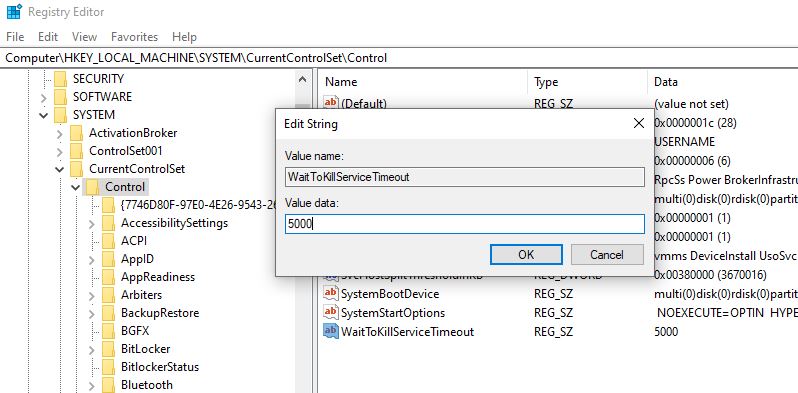
Click Ok, Close everything, and reboot your PC to apply the changes.
