
Do you notice windows 10 installing the same updates again And Again? This usually happens if some update has not been installed properly, and your Windows operating system is unable to detect the installed or partially installed update. Also, Some Times corrupted update files, corrupted Windows update database, etc Cause windows 10 keeps installing the same update over and over. If you are also struggling with form similar problem, here is how to Stop Windows from Installing the Same Update Over and Over.
Windows 10 Keeps Updating
Note: Bellow Solutions are applicable to fix Different updates Related to problems for Windows 10, 8.1, and Windows 7 computers.
Here are a few workarounds that can help you fix this issue where Windows 10 is downloading and installing the same updates repeatedly.
First, note down the updated Number of the update that keeps installing (for ex KB 123456). Now
- Press Win + R, Type appwiz.cpl and hit the enter key.
- Then click on view installed updates
- right click on the problematic updates and select uninstall.
Run Windows Update Troubleshooter
Run the build-in Windows update troubleshooter, that automatically detects and fix the problem causing Windows update to install over and over. If you are Windows 7 and 8.1 users download the Windows update Troubleshooter, and double-click on it to execute the application.
Run windows update troubleshooter on windows 10
- Press Windows + I to open the windows settings app,
- Click on Update & security then troubleshoot
- Here on the right-hand side select windows update, then click on Run the troubleshooter,
- Windows Update trouble-shooter begins detecting problems.
- Check the windows update and its related service. Also clear windows update cache files.
- Wait for a while until the trouble-shooter applies the fix. Once it is done, close the troubleshooter and restart the PC; then try to reinstall the updates.

Manually clear Windows update cache
Software Distribution folder located in the Windows directory and used to temporarily store files. Which may be required to install Windows Update on your computer. Some issues with this folder or if the software Distribution folder gets corrupted this may cause different Windows update Related problems. If Windows update troubleshooter fails to detect the problem follow steps below to manually clear windows update cache.
- Press Windows + R, type services.msc, and ok
- This will open windows services console,
- Scroll down and look for windows update service,
- Right-click on Windows update service select stop,
- Also, stop superfetch and BITs service in a similar way
- And then minimize the windows services console
Clear windows update cache
- Now press Windows + E keyboard shortcut to open file explorer,
- Then navigate to C:\Windows\SoftwareDistribution\download.
- Then open the Download folder and Delete all the files and folders inside the Download folder.
- Go back and open DeliveryOptimization” folder.
- Again, delete all the folders and files in this folder.
- Now again open windows services console
- Right-click on Windows update service select restart,
- Do the same with Superfetch and BITs service,
- Close Windows services console, and restart windows.
- Now again check for windows updates hope this time windows updates install correctly.
Run System file checker utility
Sometimes corrupted missing system files cause different problems to include Windows updates to stuck, failed to install, or Keeps Updating over and over. Run build-in system file checker utility this will help restore missing system files with correct ones.
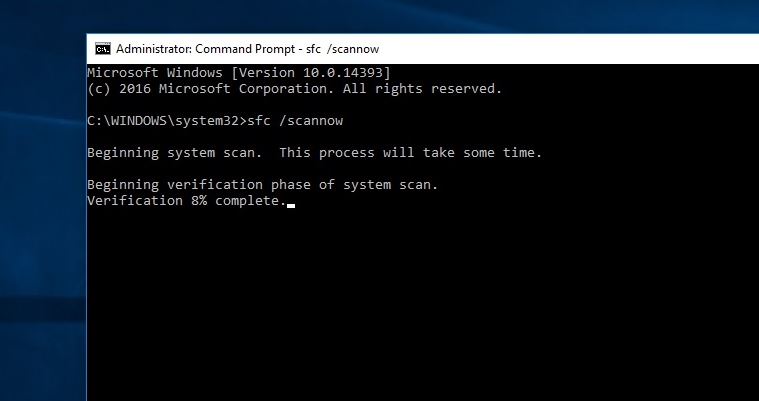
- Open the command prompt as administrator,
- Type command sfc /scannow and press the enter key,
- this will detect and restore missing system files with the correct one,
- let the process to 100% complete and restart windows,
- Now open windows update and hit the check for updates button.
Repair Visual C++ 2012
Also, Some Users Report repairs The Visual C++ 2012 Help them to resolved to install the same updates again and again. You can Do this by
- Open Control Panel > Click on Programs > Click on Programs and features.
- From the list of displayed programs, look for all the programs that contain Visual C++ 2012.
- Now one by one, right-click on each of them and click Repair.
- After you’re done, Restart your computer.
If none of the solutions work for you then Visit Windows Updates Catalog.
- In the search bar, enter your updated version code and press ‘Enter’ or click the ‘Search’ button.
- Download the Windows update offline package,
- Then disconnect your PC from the internet and install the offline package
- Check this helps.
These are some Most applicable solutions to fix windows 10 keeps installing the same update over and over. I hope After applying the Above steps your problem will get resolved. Have any query, Suggestion or face difficulty while apply above steps feel free to discuss on comments below.